
Download Creality Slicer
The official slicer for Creality 3D printers. Slice STL files, send prints over WiFi, and manage your entire print farm from one free app.
What Is Creality Print?
A complete guide to the official 3D printing slicer built for every Creality printer
Creality Print (formerly known as Creality Slicer) is a free, open-source FDM slicing application developed by Shenzhen Creality 3D Technology Co., Ltd. The Creality Print download gives you everything you need to prepare 3D models for printing on any Creality printer — from the popular Ender 3 series to the high-speed K1 and K2 lines. It converts STL, OBJ, and 3MF model files into G-code instructions your printer can execute, and it does so with pre-tuned profiles that take the guesswork out of getting a good first print.
Who Is It For?
Creality Print is designed for anyone who owns a Creality 3D printer, whether you are a complete beginner or a seasoned maker. If you have just unboxed an Ender 3 V3 or a K1 Max and want to start printing right away, this slicer gets you from model to finished print with minimal setup. Hobbyists running small print farms also benefit from built-in LAN printing and batch job management, which let you control multiple printers from one screen without swapping SD cards.
What Makes It Different?
Unlike general-purpose slicers such as UltiMaker Cura or PrusaSlicer, Creality Print is built around the Creality ecosystem. Every supported printer ships with factory-tuned profiles that include optimal nozzle temperatures, speeds, and retraction values. Version 7.0.1 introduces AI-powered support analysis, TPMS gradient infills for variable-density structures, and a redesigned interface with community integration. The slicing engine itself is 2-3x faster than earlier versions — a standard Benchy slices in roughly 45 seconds.
Connectivity and Cloud
Creality Print connects directly to WiFi-enabled Creality printers over your local network. You can scan for devices, send print jobs with one click, and monitor progress without ever leaving the app. For users who want remote access, Creality Cloud integration lets you slice, upload, and start prints from anywhere. The software works fully offline for standard slicing, so an internet connection is optional.
The source code is available on GitHub under an open-source license, which means the community can inspect, contribute to, and build on the software. Creality Print runs on Windows 7 and later (64-bit), macOS 10.14+ (with separate Intel and Apple Silicon builds), and Linux (Ubuntu 20.04+ class distributions).
Ready to get started? Download Creality Print 7.0.1 and set up your first print in minutes.
Key Features
Everything you need to prepare, slice, and send prints — all in one application
High-Speed Slicing Engine
Version 7.0 delivers 2-3x faster slicing than earlier releases. Initial slices are 10-70% faster, and re-slices run about 50% quicker. A standard Benchy model slices in approximately 45 seconds.
One-Click LAN Printing
Connect to WiFi-enabled Creality printers over your local network. Scan for devices or enter IP addresses manually, then send print jobs directly — no SD cards or USB drives required.
AI-Powered Support Analysis
New in v7.0, the AI engine automatically recommends support placement and optimal orientation. It also detects and repairs STL integrity errors before slicing begins.
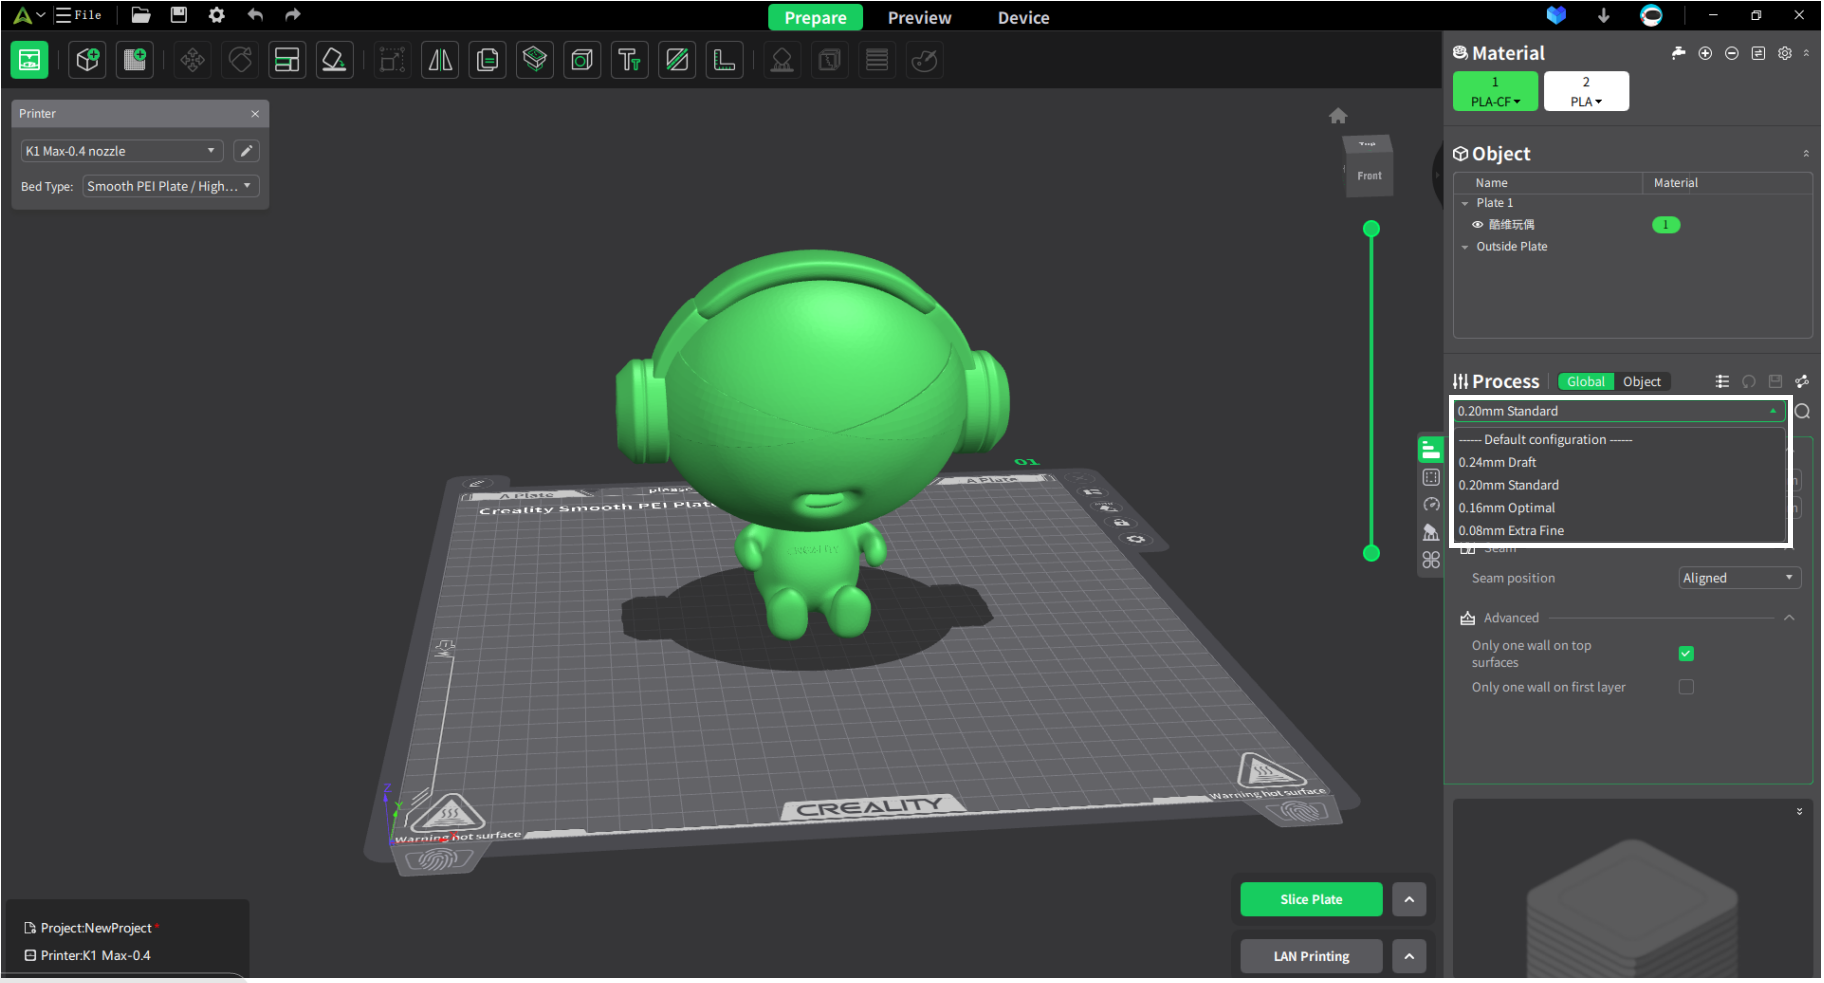
Pre-Built Printer Profiles
Ships with optimized presets for the entire Creality ecosystem: Ender 3 V3, K1, K1C, K1 Max, K2, K2 Plus, CR-10, and more. Each profile includes tuned temperatures, speeds, and retraction settings.
Creality Cloud Integration
Sync with Creality Cloud for remote printing, model browsing, and multi-device management. Upload models, slice remotely, and start prints from your phone or another computer.
Advanced Infill Patterns
Choose from Cubic, Gyroid, Lightning, TPMS, TPMS-FK Lattice, Zig Zag, and gradient infill options. TPMS gradient infills provide variable density for strength-to-weight optimization.
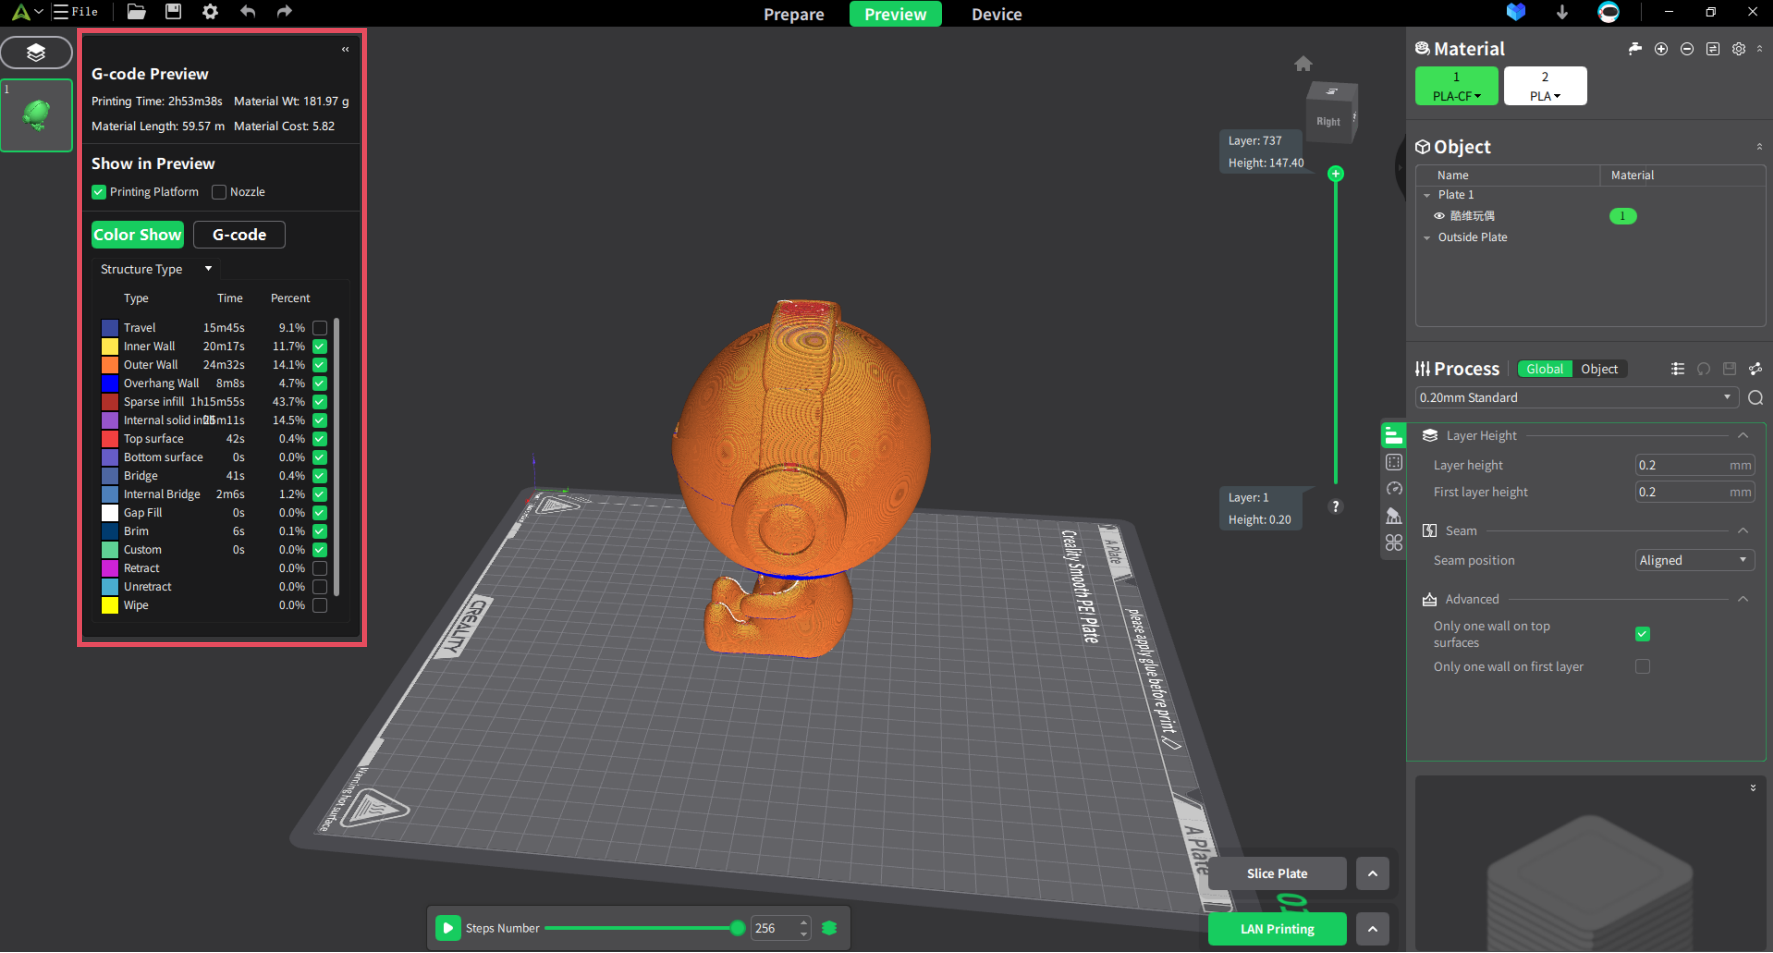
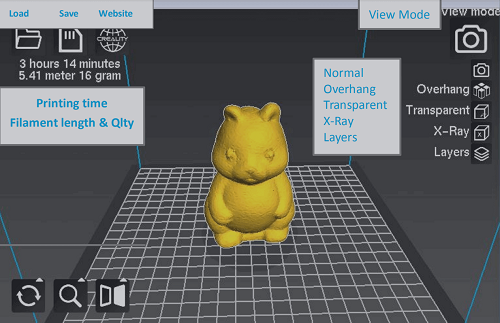
Real-Time Layer Preview
Inspect G-code layer by layer before printing. Visualize travel paths, extrusion widths, support structures, and estimated print times. LOD rendering boosts preview FPS by 15-100%.
Multi-Device Batch Printing
Send the same print job to multiple printers of the same model simultaneously. Supports batch production workflows over LAN or cloud connections for print farm operations.
Comprehensive Filament Support
Pre-configured profiles for PLA, PETG, ABS, TPU, ASA, Nylon, and specialty filaments. K-series machines support 42+ official Creality filament profiles with optimized parameters.
See what these features can do for your prints — download Creality Print free
System Requirements
Make sure your computer meets these specs before installing Creality Print
| Component | Minimum | Recommended |
|---|---|---|
| Operating System | Windows 7 (64-bit) | Windows 10/11 (64-bit) |
| Processor (CPU) | Intel Core 2 or AMD Athlon 64 | Intel Core i3 or equivalent AMD |
| RAM | 4 GB | 8 GB |
| Disk Space | 550 MB free | 600 MB + working space |
| GPU | OpenGL 2-capable | OpenGL 4.1-compatible |
| Display | 1024 × 768 | 1920 × 1080 |
| Internet | Not required for slicing | Required for cloud, LAN printing, updates |
Download Creality Print 7.0
Get the latest version of the official Creality 3D printing slicer — completely free for all platforms
Creality Print for Windows
Version 7.0.0 (Build 4128) · Official GitHub Release
Download Creality Print 7.0 for Windows Free · 257.8 MB · Windows Installer (.exe)All Platform Downloads
All downloads sourced from the official Creality GitHub repository
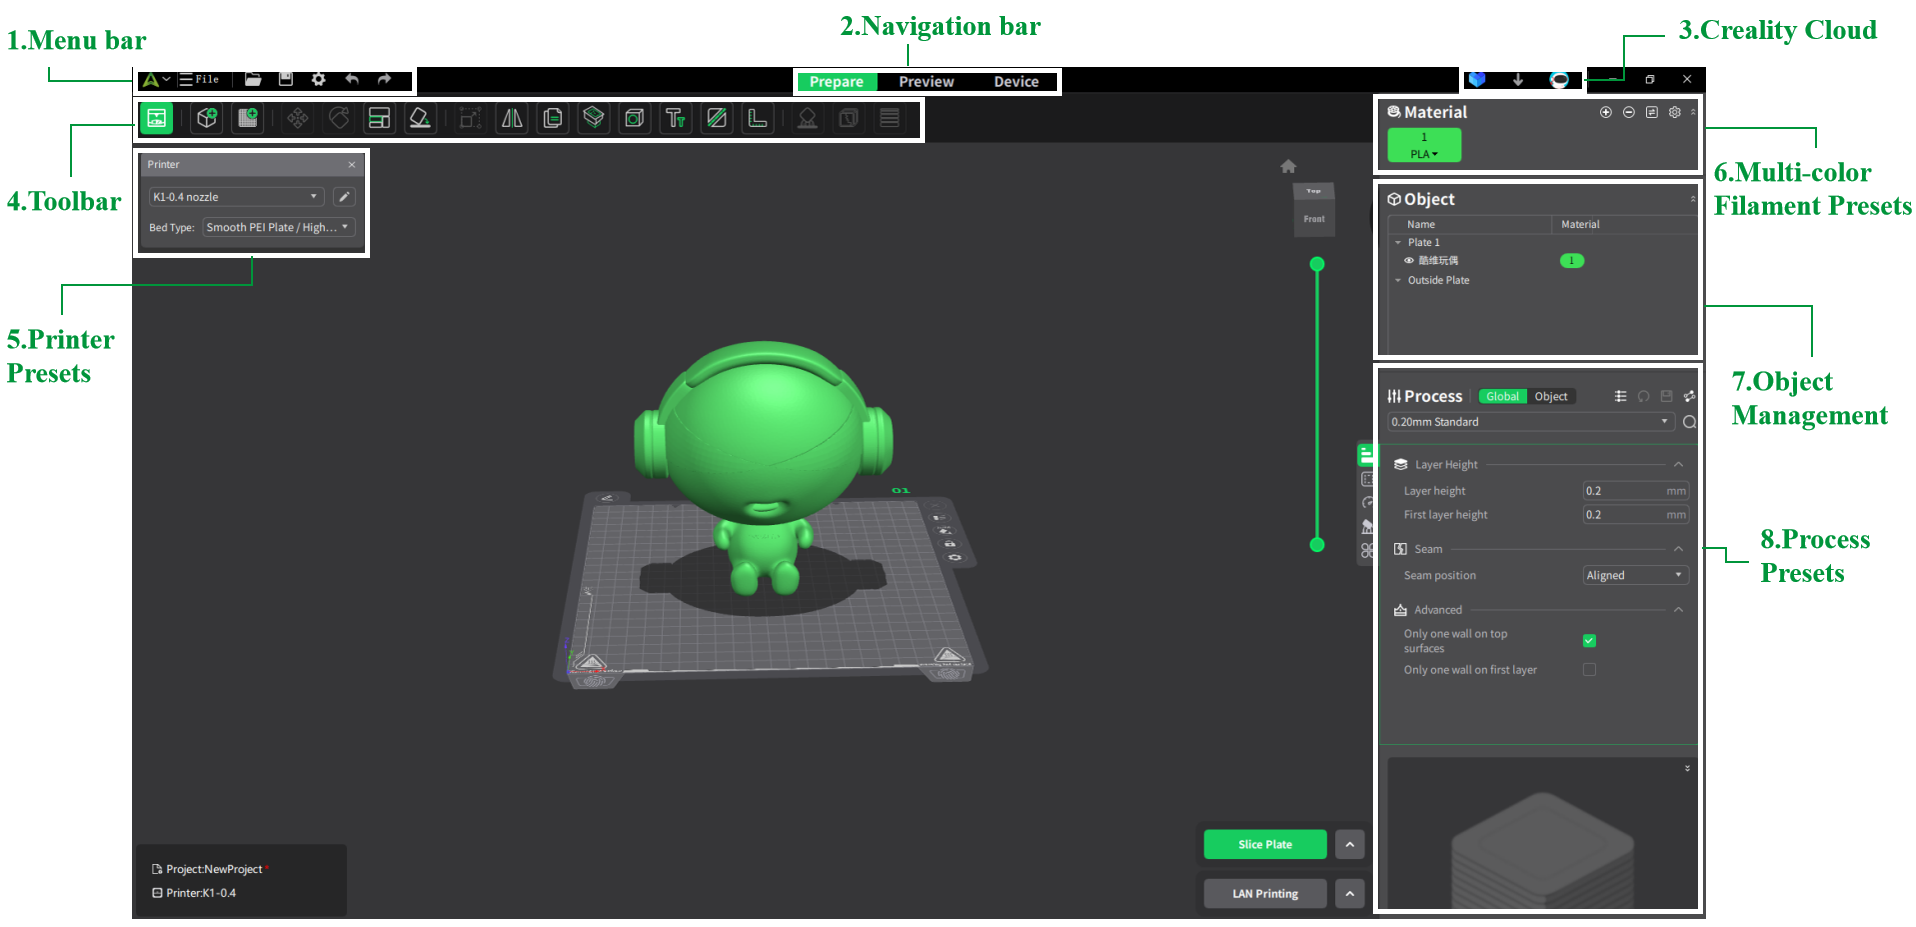
Screenshots
See the Creality Print interface in action — click any image to enlarge
How to Install Creality Print
Follow this step-by-step guide to download, install, and configure Creality Print on your PC
Download the Installer
Head to our download section above and click the green “Download Creality Print 7.0.1” button. The download is a standard Windows installer file named CrealityPrint_7.0.1.4212_Release.exe, approximately 158 MB in size. Save it somewhere easy to find, like your Desktop or Downloads folder.
Run the Installer
Double-click the downloaded .exe file to launch the installer. If Windows Defender SmartScreen displays a warning, click “More info” and then “Run anyway” — this happens because the installer is not yet widely distributed enough for Windows to recognize it automatically.
Accept the license agreement on the first screen and click “Next”. Choose your installation directory or keep the default path, then click “Next” again. The installer may prompt you to install Microsoft Edge WebView2 Runtime and Visual C++ Redistributables if they are not already on your system. Allow these installations — they are required dependencies.
Click “Install” and wait for the progress bar to complete. This usually takes 1-2 minutes depending on your disk speed.
Initial Configuration
Check the “Run Creality Print” box and click “Finish” to launch the application immediately. On first launch, you will be asked to select your preferred language and region.
Next, choose your Creality printer model from the dropdown list. Creality Print includes profiles for the Ender 3, Ender 3 V2, Ender 3 V3, Ender 3 S1, K1, K1C, K1 Max, K2, K2 Plus, CR-10, CR-6 SE, and many more. Select the exact model you own and pick the correct nozzle size (0.4mm is standard for most printers).
Then select your filament type. Start with PLA if you are new to 3D printing — it is the easiest material to work with. Creality Print includes temperature and speed profiles for PLA, PETG, ABS, TPU, ASA, Nylon, and over 42 official Creality filament types.
Your First Print
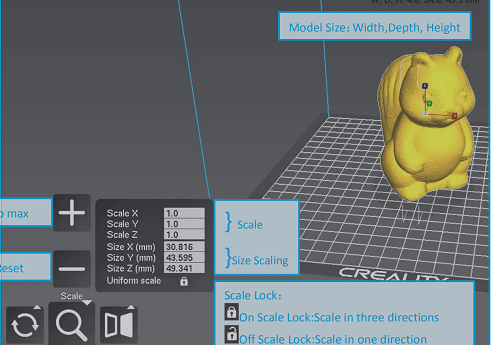
Click the Import button on the left toolbar (or use Ctrl+I) to load an STL, OBJ, or 3MF file. Your model appears on the virtual build plate, where you can reposition, rotate, and scale it using the toolbar on the left side.
With your model placed, click “Slice” in the bottom-right corner. Creality Print generates G-code and shows you a preview with estimated print time and filament usage. Use the layer slider on the right to scroll through every layer and verify everything looks correct.
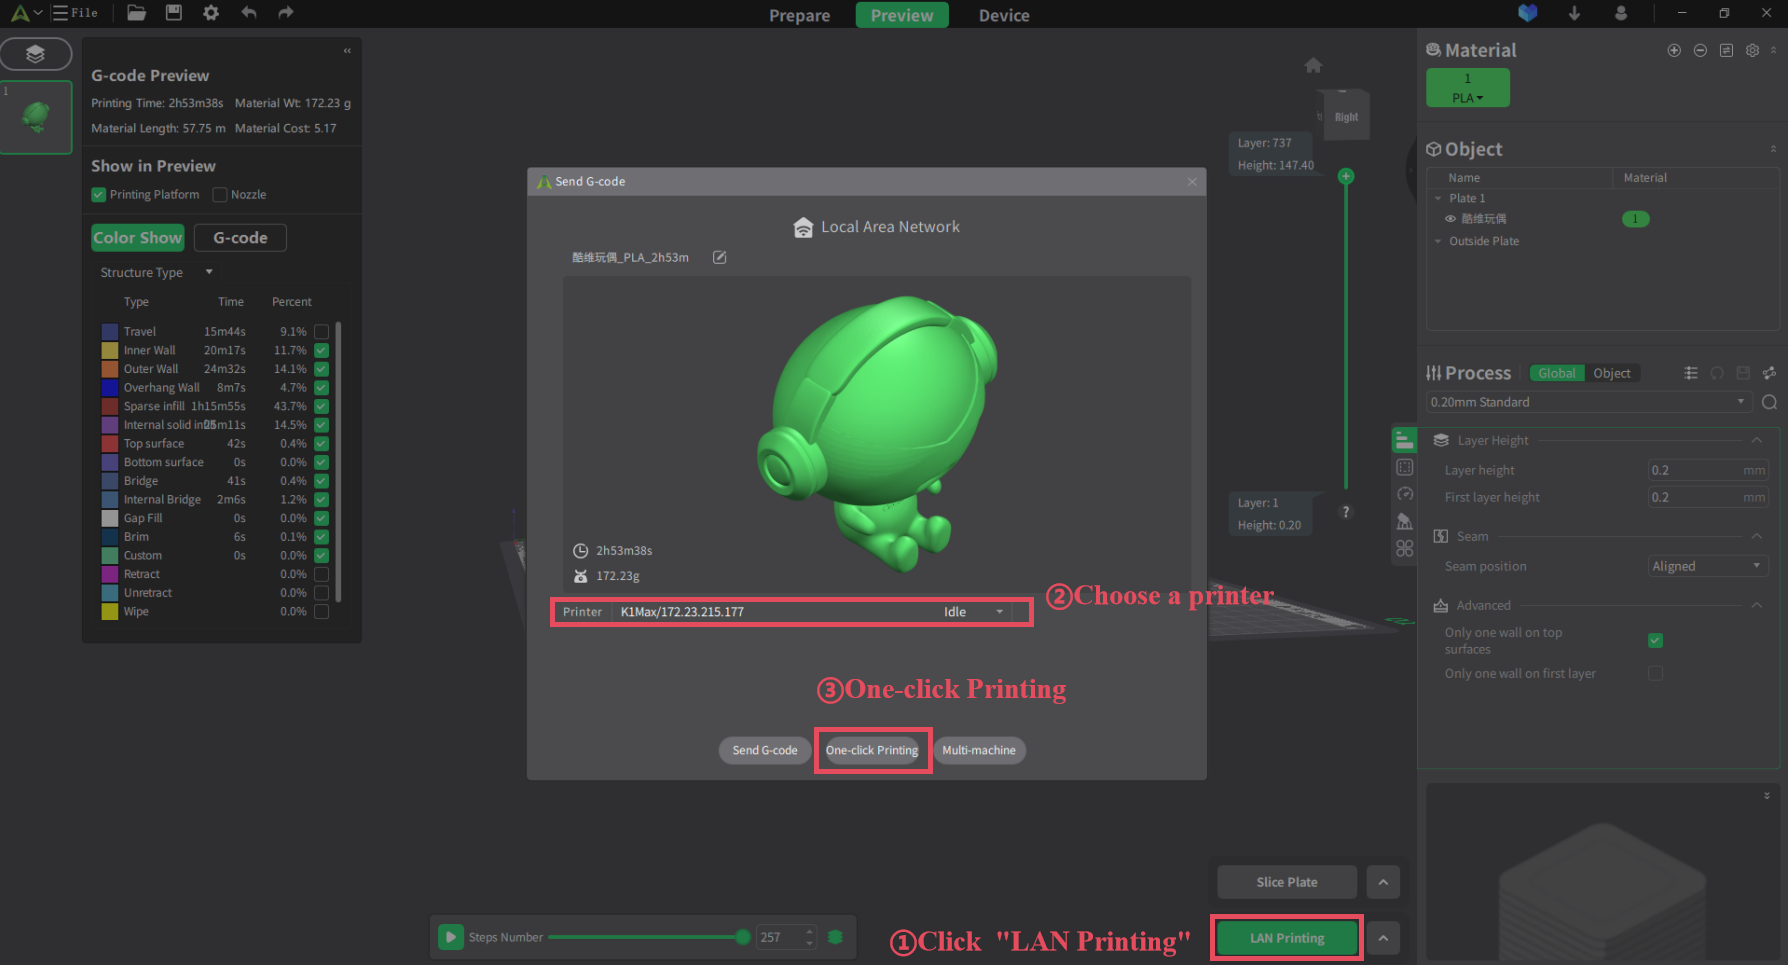
To send the job to your printer, you have two options:
Option A — LAN Printing: If your printer is connected to the same WiFi network, click the “Devices” tab to find it. Select your printer and click “One-Click Print” to send the G-code directly over your local network.
Option B — SD Card / USB: Click “Export” to save the G-code file. Copy it to an SD card or USB drive, insert it into your printer, and start the print from the printer’s screen.
Need the installer? Download Creality Print 7.0.1 from our download section above.
Frequently Asked Questions
Answers to common questions about downloading, installing, and using Creality Print
Is Creality Print free to download and use?
Yes, Creality Print is completely free to download and use with no feature restrictions, subscriptions, or hidden costs. The software is developed by Shenzhen Creality 3D Technology and distributed at no charge. The source code is also available on GitHub under an open-source license, which means anyone can inspect and contribute to the project.
Is Creality Print safe to install on my computer?
Yes, Creality Print is safe when downloaded from the official source. The software is developed by Creality, one of the largest 3D printer manufacturers in the world. Some antivirus programs or Windows SmartScreen may flag the installer because it is less widely distributed than mainstream software, but this is a false positive. Always download from the official Creality website or our download section to ensure you get the genuine installer.
What is the difference between Creality Slicer and Creality Print?
Creality Slicer was the older name for the software, which was originally a fork of UltiMaker Cura. Creality Print is the current, rebranded version that has been largely rewritten with a new interface, faster slicing engine, LAN printing, cloud integration, and AI features. If you are using an older version called “Creality Slicer,” you should upgrade to Creality Print for better performance and more features.
Can I use Creality Print with non-Creality printers?
Creality Print is primarily designed for Creality printers, and all the built-in profiles are tuned for Creality models. While you can technically add custom printer profiles for non-Creality machines by manually entering the bed size, nozzle diameter, and firmware settings, the results may not be as well-optimized as using a general-purpose slicer like PrusaSlicer or OrcaSlicer. For non-Creality printers, those alternatives are usually a better choice.
Does Creality Print work on Mac?
Yes, Creality Print supports macOS 10.14 (Mojave) and later. Separate builds are available for Intel-based Macs and Apple Silicon (M1/M2/M3/M4) Macs. You can download the macOS version from the official Creality Cloud downloads page. The Mac version includes the same features as the Windows version, including LAN printing and cloud integration.
Does Creality Print work on Windows 11?
Yes, Creality Print runs on Windows 11 without any issues. The software supports Windows 7 and later (64-bit only). Windows 10 and 11 are the recommended operating systems for the best performance and compatibility. Make sure you have at least 4 GB of RAM and an OpenGL 2-capable GPU for basic functionality.
How do I connect my printer to Creality Print over WiFi?
First, make sure your printer is connected to the same WiFi network as your computer. In Creality Print, click the “Devices” tab at the top. The software will automatically scan for printers on your local network. If your printer does not appear, you can click “Add Printer” and enter the IP address manually (you can find the IP in your printer’s network settings menu). Once connected, you can send sliced files directly with one click.
How do I update Creality Print to the latest version?
Creality Print checks for updates automatically when it starts (if you have an internet connection). When an update is available, a notification will appear prompting you to download and install the new version. Alternatively, you can always visit our download section to get the latest installer and install it over your existing version. Your printer profiles and settings will be preserved during the update.
Creality Print vs Cura — which is better?
If you own a Creality printer, Creality Print is the better choice for most users. It ships with factory-tuned profiles for every Creality model, offers one-click LAN printing, and slices 2-3x faster than Cura in recent versions. Cura, on the other hand, supports a much wider range of printers from different brands and has a larger plugin ecosystem. Advanced users who want more granular control or who use multiple printer brands often prefer Cura or OrcaSlicer. For Creality owners who want a simple, optimized workflow, Creality Print is hard to beat.
Creality Print vs OrcaSlicer — which should I use?
OrcaSlicer is a popular open-source alternative that supports many printer brands and offers advanced calibration tools (flow rate, pressure advance, retraction). It gives you more fine-grained control over settings and is favored by users who like to tune every parameter. Creality Print is simpler to use, has one-click LAN printing, and includes Creality Cloud integration. If you want maximum control and tinker with your prints, try OrcaSlicer. If you want a streamlined experience that works great out of the box with your Creality printer, stick with Creality Print.
Does Creality Print support PETG, ABS, and TPU filaments?
Yes, Creality Print includes pre-configured profiles for PLA, PETG, ABS, TPU, ASA, Nylon, and many specialty filaments. The K-series printers (K1, K1C, K1 Max, K2) have 42+ official Creality filament profiles with tuned temperature, speed, and retraction settings. You can also create custom filament profiles if you use third-party filaments that are not in the default list.
Why does Creality Print keep crashing or freezing?
Crashes are usually caused by insufficient system resources or GPU driver issues. Make sure your computer meets the minimum requirements: 4 GB RAM and an OpenGL 2-capable GPU. Update your graphics drivers to the latest version. If the application crashes during slicing, try reducing the model complexity or closing other memory-heavy programs. You can also try running Creality Print as Administrator. If problems persist after a major version update, uninstall completely and do a fresh install of the latest version.
Does Creality Print require an internet connection?
No, an internet connection is not required for core slicing functionality. You can import models, configure settings, slice, and export G-code completely offline. An internet connection is only needed for Creality Cloud features (remote printing, model downloads), LAN printer discovery, software updates, and the AI analysis features. If you prefer to work offline, Creality Print functions perfectly as a standalone desktop slicer.
Can Creality Print be used on Linux?
Yes, Creality Print offers a Linux build that supports Ubuntu 20.04 and equivalent 64-bit distributions. You can download the Linux version from the official Creality Cloud downloads page. The Linux version includes the same core features as Windows and macOS, though some users report that LAN printing support may be less stable on Linux compared to Windows.
Where can I download Creality Print officially?
You can download Creality Print from our download section on this page, which links directly to the official Creality Cloud source. The official download page is hosted at crealitycloud.com. Always avoid third-party download sites that may bundle the installer with unwanted software or outdated versions.
Still have questions? Download Creality Print and explore the built-in help documentation.